Bring Light To The Darkness
Bring light to the darkness - Reversing a Qualcomm Hexagon QDSP modem for profit - Part 1
A friendly and warm welcome to the first part of my Qualcomm reversing and exploitation blog in memory of Fravia’s ORC and frequently requested by my twitter followers. This research wouldn’t have been possible without the great people at 4PDA but also for Zibri who first pointed me to the sierra wireless modem (and its engineering stuff) more than 10 years ago.
The modem we are reverse engineering today is the em7565 modem used in many devices, such as Laptops, Netgear Wifi Routers etc. In the past, the such called “AT!OPENLOCK” functionality, which enables some secret engineering functionality was easy to reverse engineer as the old Qualcomm basebands (MDM7xxx) were used to have a simple ARM baseband. But things tend to change and Qualcomm went for a QDSP processor called Hexagon. With at first no tools available, the task of reverse engineering seemed hard. But then, tools appeared in the darkness. After some people contacted me being suppressed by their provider (or government, who knows), asking for a solution for the newer Netgear Routers (MR1100), I decided to have a look at the current generation and thus at the latest Hexagon QDSPv6 technology.
However, even now having access to several tools such as Radare and the IDA GSMK or Hexagoon plugin, things turned out to be harder than expected. At first I simply reverse engineered the new algorithm used by Sierra Wireless but it seems that even with reversing and emulating the hexagon processor, the algorithm didn’t work. Thus I had to dig deeper to figure out what might be causing my algorithm to fail.
But first things first, let’s first show you how to reverse engineer a Qualcomm QDSP modem, having nothing else than a simple firmware blob. Then we will try to identify the function that is being called once the at command “AT!OPENLOCK” is being sent to the modem.
Reversing a MDM9x15 modem
Seeking for a modem which uses the em7655 module, the first google result seems to be the Dell Wireless 5806, which is in fact a rebranded em7655 module.
So let’s simply download the firmware over here.
After downloading, we need to unpack the firmware as we won’t install the binary.
bjk@none:~/em7655$ unzip 291RY_A00_Build3724_Setup_ZPE.exe
Archive:  291RY_A00_Build3724_Setup_ZPE.exe
  inflating: Configuration.ini
  inflating: Setup.exe
  inflating: Version.txt
bjk@none:~/em7655$ 7z x Setup.exe
7-Zip [64] 16.02 : Copyright (c) 1999-2016 Igor Pavlov : 2016-05-21
p7zip Version 16.02 (locale=en_US.UTF-8,Utf16=on,HugeFiles=on,64 bits,8 CPUs Intel(R) Core(TM) i7-6700K CPU @ 4.00GHz (506E3),ASM,AES-NI)

Scanning the drive for archives:
1 file, 139734418 bytes (134 MiB)

Extracting archive: Setup.exe
--
Path = Setup.exe
Type = Nsis
Physical Size = 139734418
Method = Deflate
Solid = -
Headers Size = 296264
Embedded Stub Size = 129536
SubType = NSIS-Park-1 Unicode log
bjk@none:~/em7655$ find -name *.cwe
./Images/5000/Generic/1/SWI9X15C_01.05.11.01.cwe
./Images/5000/Generic/6/SWI9X15C_01.05.11.03.cwe
./Images/5000/Generic/2/SWI9X15C_01.05.11.00.cwe
./Images/5000/Generic/3/SWI9X15C_01.05.11.02.cwe
The cwe files are the actual firmware we are interested in. So let’s unpack the newest one.
bjk@none:~/em7655$ cd Images/5000/Generic/6
bjk@none:~/em7655/Images/5000/Generic/6$ wget https://downloads.sierrawireless.com/tools/swicwe/swicwe_latest.deb -O /tmp/swicwe_latest.deb
bjk@none:~/em7655/Images/5000/Generic/6$ sudo apt-get install /tmp/swicwe_latest.deb
bjk@none:~/em7655/Images/5000/Generic/6$ swicwe -@ SWI9X15C_01.05.11.03.cwe
Image to split is SPKG, separating components...
output file name generated for QRPM component is BOOT9X15-QRPM9X15-SWI9X15C_01.05.11.03.cwe
Found QRPM component
output file name generated for SBL2 component is BOOT9X15-SBL29X15-SWI9X15C_01.05.11.03.cwe
Found SBL2 component
output file name generated for DSP1 component is MODM9X15-DSP19X15-SWI9X15C_01.05.11.03.cwe
Found DSP1 component
output file name generated for DSP2 component is MODM9X15-DSP29X15-SWI9X15C_01.05.11.03.cwe
Found DSP2 component
output file name generated for APBL component is APPL9X15-APBL9X15-SWI9X15C_01.05.11.03.cwe
Found APBL component
output file name generated for SYST component is APPL9X15-SYST9X15-SWI9X15C_01.05.11.03.cwe
Found SYST component
output file name generated for USER component is APPL9X15-USER9X15-SWI9X15C_01.05.11.03.cwe
Found USER component
output file name generated for APPS component is APPL9X15-APPS9X15-SWI9X15C_01.05.11.03.cwe
Found APPS component
As we guess that all AT commands are being handled by the DSP, let’s have a look it this one…
bjk@none:~/em7655/Images/5000/Generic/6$ cd SWI9X15C_01.05.11.03.cwe-level-2-components/

bjk@none:~/em7655/Images/5000/Generic/6/SWI9X15C_01.05.11.03.cwe-level-2-components$ ls
APPL9X15-APBL9X15-SWI9X15C_01.05.11.03.cwe  BOOT9X15-QRPM9X15-SWI9X15C_01.05.11.03.cwe
APPL9X15-APPS9X15-SWI9X15C_01.05.11.03.cwe  BOOT9X15-SBL29X15-SWI9X15C_01.05.11.03.cwe
APPL9X15-SYST9X15-SWI9X15C_01.05.11.03.cwe  MODM9X15-DSP19X15-SWI9X15C_01.05.11.03.cwe
APPL9X15-USER9X15-SWI9X15C_01.05.11.03.cwe  MODM9X15-DSP29X15-SWI9X15C_01.05.11.03.cwe
bjk@none:~/em7655/Images/5000/Generic/6/SWI9X15C_01.05.11.03.cwe-level-2-components$ binwalk -e MODM9X15-DSP19X15-SWI9X15C_01.05.11.03.cwe
bjk@none:~/em7655/Images/5000/Generic/6/SWI9X15C_01.05.11.03.cwe-level-2-components$ binwalk -e MODM9X15-DSP29X15-SWI9X15C_01.05.11.03.cwe
As the DSP2 binary seems to have the at commands, but misses obviously the elf header, we just copy it from the dspv1 binary.
bjk@none:~/em7655/Images/5000/Generic/6/SWI9X15C_01.05.11.03.cwe-level-2-components$ dd if=_MODM9X15-DSP19X15-SWI9X15C_01.05.11.03.cwe.extracted/190 bs=1 count=52 of=~/em7655/modem.elf
52+0 records in
52+0 records out
52 bytes copied, 0,00120222 s, 43,3 kB/s

bjk@none:~/em7655/Images/5000/Generic/6/SWI9X15C_01.05.11.03.cwe-level-2-components$ cat _MODM9X15-DSP29X15-SWI9X15C_01.05.11.03.cwe.extracted/190 >> ~/em7655/modem.elf
In order to analyse the Hexagon Binary, let’s first fire up IDA. For that, we will need a disassembler for hexagon DSP. Sorry folks, there isn’t yet any usable one for ghidra.
The most “usable” turned out to be the plugin made by a well known hacker @itsme over here.
We will download the .so Library for Linux here and place it to the “procs” directory of IDA. For Windows, use the .dll instead.
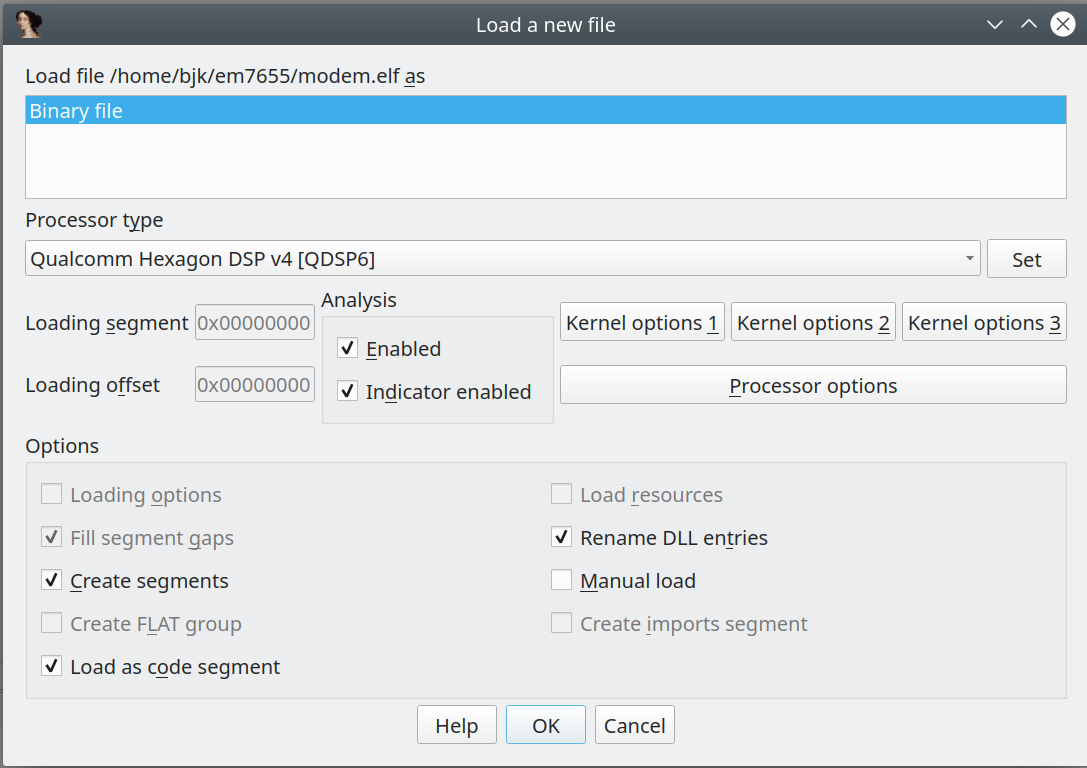
Fire up IDA32, open the “modem.elf” we created and select “Qualcomm Hexagon DSP v4” from the Processor type:
 But wth is this …
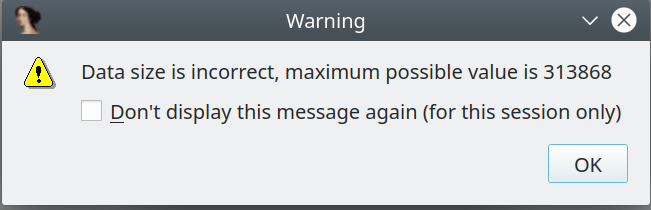
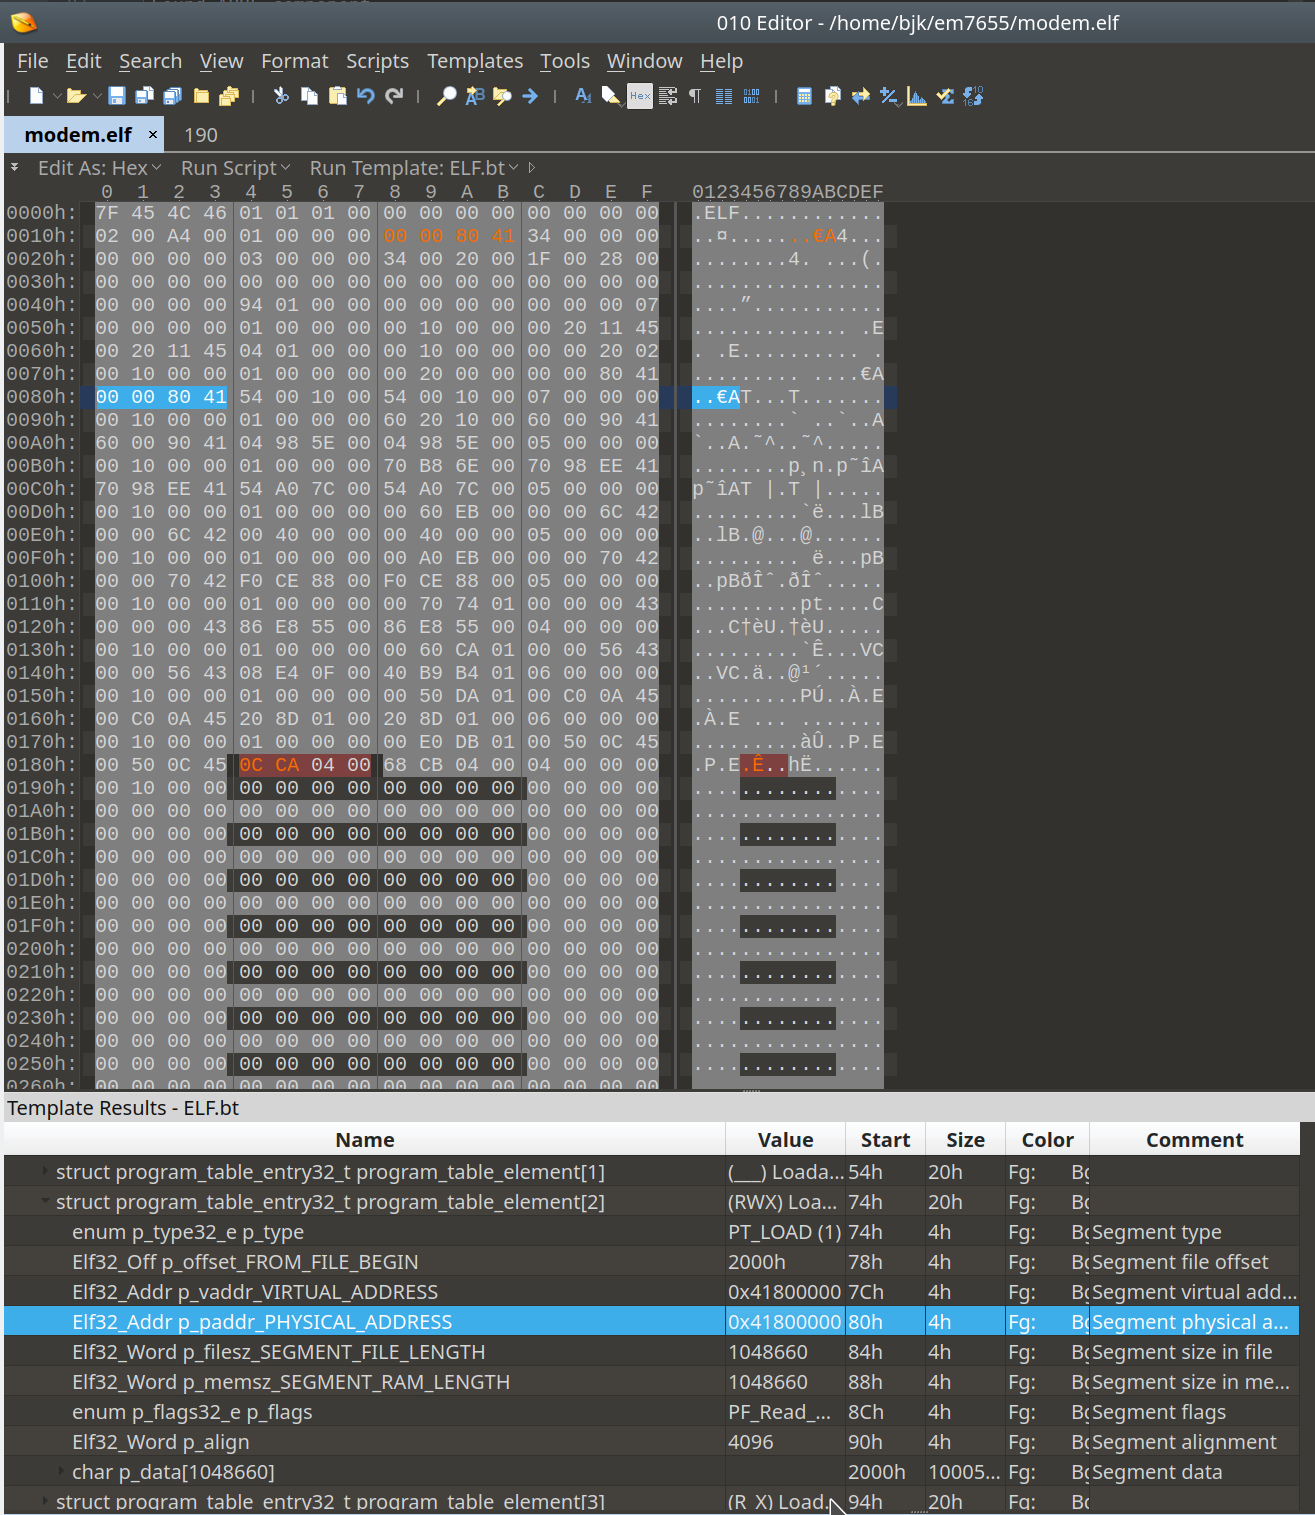
So we need to fix the elf header first. Using the 010 Editor and the elf template, fixing is easy. We fix the e_entry_START_ADDRESS to be 0x41800000 (Using value from program table 2, Virtual Address) and the value of program_table_element10, which seems to cause the ida error, to match the value ida displayed (313868). Save it, and retry opening it up in IDA. So here we are.
It will take quite some time to analyse the modem elf, so take your time.
Now we search for “!OPENLOCK” using “Alt-B”, make sure you use quotation marks for searching :
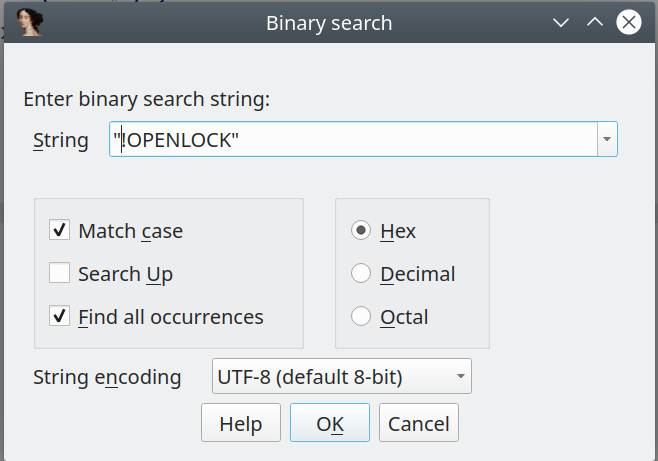
At the search result, in our case at @0x43347EB8, press “a” to get the ascii representation. It should then show “!OPENLOCK”. And having a look at the offset @0x43347EE5 we see a function pointer for that at command, so we just press “o” at this offset.
So we have successfully identified the AT!Openlock function at @0x43347EE5. Easy, huh ? Now let’s see the changes that were made for the newer MDM9x30/MDM9x40/MDM9x5x modems.
Reversing QDSPv6 : the MDM9x50 modem
Let’s search for a firmware to reverse for the em7565 module, which holds a Qualcomm MDM9x50 chipset. Thanks to LTE Hacks, we are downloading a generic firmware over here, file :
GN3_9999999_9907259_SWI9X50C_01.09.04.00_00_GENERIC_002.019_000.exe
For this, we extract the firmware the usual way :
bjk@none:~/em7565$ unrar x GN3_9999999_9907259_SWI9X50C_01.09.04.00_00_GENERIC_002.019_000.exe

bjk@none:~/em7565$ swicwe -@ SWI9X50C_01.09.04.00.cwe
Image to split is SPKG, separating components...
output file name generated for HASH component is SPKG9X50-HASH9X50-SWI9X50C_01.09.04.00.cwe
Found HASH component
output file name generated for HASH component is BOOT9X50-HASH9X50-SWI9X50C_01.09.04.00.cwe
Found HASH component
output file name generated for SBL1 component is BOOT9X50-SBL19X50-SWI9X50C_01.09.04.00.cwe
Found SBL1 component
output file name generated for HASH component is MODM9X50-HASH9X50-SWI9X50C_01.09.04.00.cwe
Found HASH component
output file name generated for TZON component is MODM9X50-TZON9X50-SWI9X50C_01.09.04.00.cwe
Found TZON component
output file name generated for QRPM component is MODM9X50-QRPM9X50-SWI9X50C_01.09.04.00.cwe
Found QRPM component
output file name generated for DSP2 component is MODM9X50-DSP29X50-SWI9X50C_01.09.04.00.cwe
Found DSP2 component
output file name generated for HASH component is APPL9X50-HASH9X50-SWI9X50C_01.09.04.00.cwe
Found HASH component
output file name generated for APBL component is APPL9X50-APBL9X50-SWI9X50C_01.09.04.00.cwe
Found APBL component
output file name generated for SYST component is APPL9X50-SYST9X50-SWI9X50C_01.09.04.00.cwe
Found SYST component
output file name generated for APPS component is APPL9X50-APPS9X50-SWI9X50C_01.09.04.00.cwe
Found APPS component

bjk@none:~/em7565$ binwalk -e SWI9X50C_01.09.04.00.cwe-level-2-components/MODM9X50-DSP29X50-SWI9X50C_01.09.04.00.cwe
However this time, the file “190” that binwalk extracted, has a ubifs filesystem header “UBI#”. In order to extract this image, we use @itsme’s ubidump script, which I modified for python 3 here.
bjk@none:~/em7565$ sudo apt install liblzo2-dev
bjk@none:~/em7565$ pip3 install crcmod python-lzo
bjk@none:~/em7565$ ubidump SWI9X50C_01.09.04.00.cwe-level-2-components/_MODM9X50-DSP29X50-SWI9X50C_01.09.04.00.cwe.extracted/190 --savedir .
==> SWI9X50C_01.09.04.00.cwe-level-2-components/_MODM9X50-DSP29X50-SWI9X50C_01.09.04.00.cwe.extracted/190 <==
1 named volumes found, 3 physical volumes, blocksize=0x40000
== volume b'modem' ==
saved 43 files
The modem directory contains several files mdt and bxx files that need to be combined. For this task, we use @laginimaineb’s unify_trustlet script (modified for python3 as well) here:
bjk@none:~/em7565$ ~/Projects/qc_modem_tools/unify_trustlet modem/image/ modem modem.elf
[+] Found 31 program headers
[+] Reading PHDR 0
[+] Size: 0x00000414, Offset: 0x00000000
[+] Reading PHDR 1
[+] Size: 0x00001D08, Offset: 0x00001000
[+] Reading PHDR 2
[+] Size: 0x0000B030, Offset: 0x00003000
[+] Reading PHDR 3
[+] Size: 0x000358A0, Offset: 0x0000F000
[+] Reading PHDR 4
[+] Size: 0x0004BD2B, Offset: 0x00045000
[+] Reading PHDR 5
[+] Size: 0x0000C199, Offset: 0x00091000
[+] Reading PHDR 6
[+] Size: 0x000209FC, Offset: 0x0009E000
[+] Reading PHDR 7
[+] Size: 0x00055054, Offset: 0x000BF000
[+] Reading PHDR 8
[+] Size: 0x0022EC5C, Offset: 0x00115000
[+] Reading PHDR 9
[+] Size: 0x000000A4, Offset: 0x00344000
[+] Reading PHDR 10
[+] Size: 0x0010D000, Offset: 0x00345000
[+] Reading PHDR 11
[+] Size: 0x0111A570, Offset: 0x00452000
[+] Reading PHDR 12
[+] Size: 0x0002FF00, Offset: 0x0156D000
[+] Reading PHDR 13
[+] Size: 0x00000000, Offset: 0x0159D000
[+] Empty block, skipping
[+] Reading PHDR 14
[+] Size: 0x0007E590, Offset: 0x0159D000
[+] Reading PHDR 15
[+] Size: 0x00F52E71, Offset: 0x0161C000
[+] Reading PHDR 16
[+] Size: 0x002DEBB0, Offset: 0x0256F000
[+] Reading PHDR 17
[+] Size: 0x00000000, Offset: 0x0284E000
[+] Empty block, skipping
[+] Reading PHDR 18
[+] Size: 0x0000F240, Offset: 0x0284E000
[+] Reading PHDR 19
[+] Size: 0x000992A7, Offset: 0x0285E000
[+] Reading PHDR 20
[+] Size: 0x0091D000, Offset: 0x028F8000
[+] Reading PHDR 21
[+] Size: 0x00020000, Offset: 0x03215000
[+] Reading PHDR 22
[+] Size: 0x0017E000, Offset: 0x03235000
[+] Reading PHDR 23
[+] Size: 0x00001000, Offset: 0x033B3000
[+] Reading PHDR 24
[+] Size: 0x003FA000, Offset: 0x033B4000
[+] Reading PHDR 25
[+] Size: 0x000DD624, Offset: 0x037AE000
[+] Reading PHDR 26
[+] Size: 0x0003F070, Offset: 0x0388C000
[+] Reading PHDR 27
[+] Size: 0x00000000, Offset: 0x038CC000
[+] Empty block, skipping
[+] Reading PHDR 28
[+] Size: 0x00000290, Offset: 0x038CC000
[+] Reading PHDR 29
[+] Size: 0x00035D80, Offset: 0x038CD000
[+] Reading PHDR 30
[+] Size: 0x00000000, Offset: 0x03903000
[+] Empty block, skipping
As we’re done, let’s open up the resulting modem.elf in IDA. No need to reconstruct anything this time :) Searching for the “!OPENLOCK” string using the binary search, we immediately see some change :
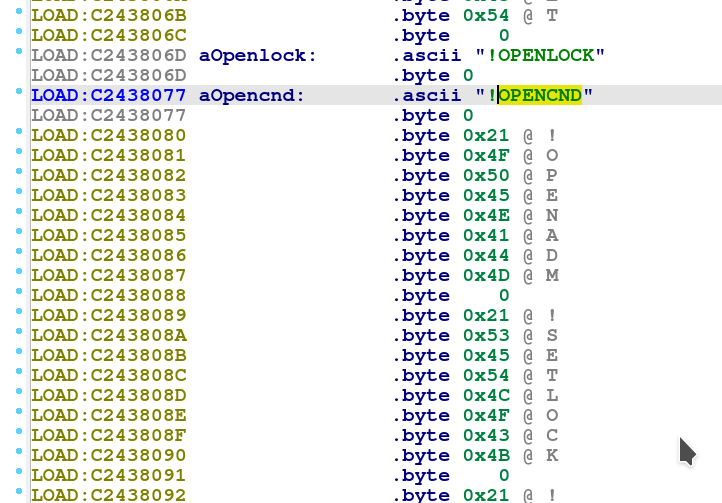
Obviously, we are facing a string array and no function pointer. Thus, we are searching for references to the string using the binary search “Alt-B” and we enter the offset @0xC243806D “6D 80 43 C2”.
It seems the offset is referenced at @0xC2439F10, but there is still no pointer. However, we see some internal pointer with value 0x3CC2, which seems to increase for other commands.
Looking at the resulting offsets, we immediately see a structure of a possible vpointer table :
- String array @0xC2436D5C
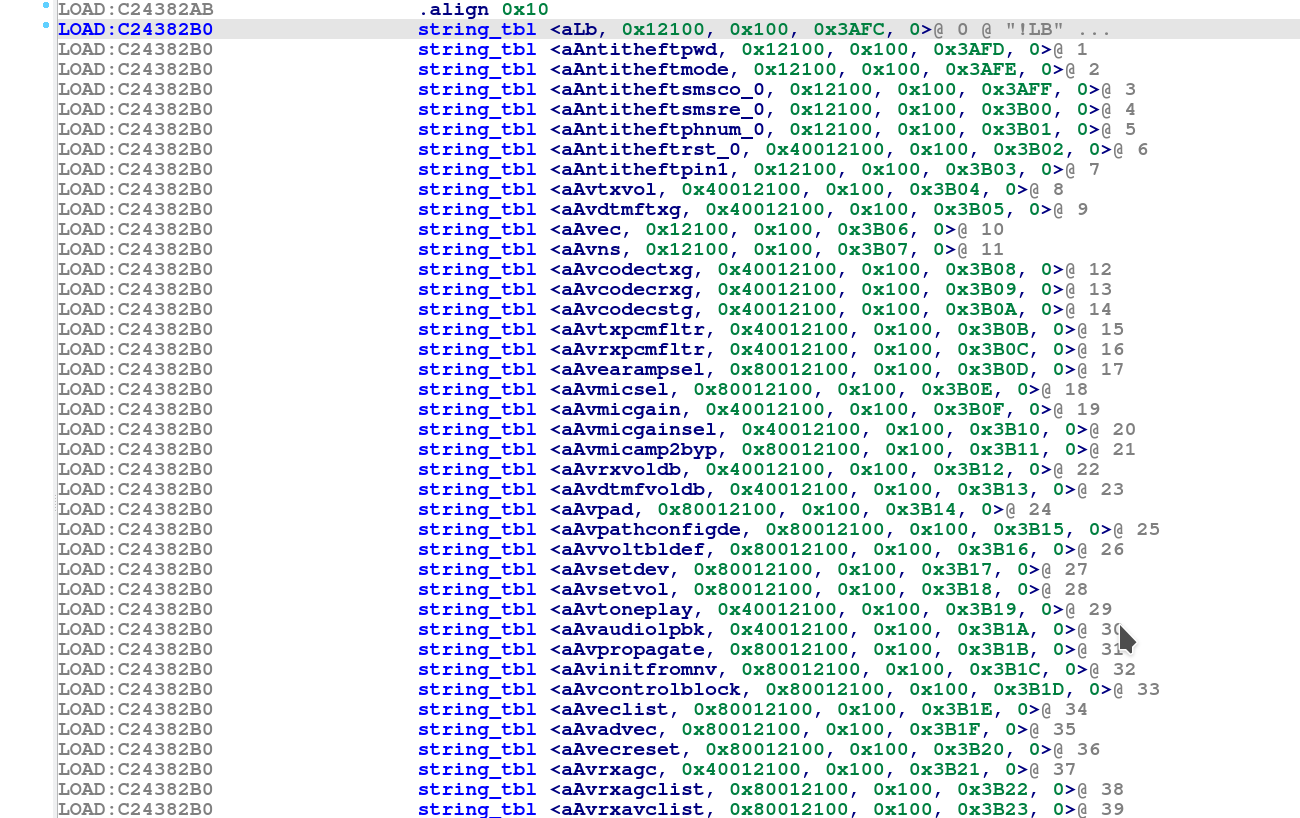
- String to internal index array (string_tbl) @0xC24382B0
So in order to understand the structure of the table array, we create a pointer array for the “string_tbl” first : Go to the offset @0xC24382B0 where the array seems to start and press “o” to have an offset pointer. Go to @0xC24382B4 and press “d” three times, until it shows .long in front. Then for the offset @0xC24382B8, press two times “d” for having a .short value and do the same for the offset @0xC24382BA. At offset @0xC24382BA, press three times “d” for having another .long value and then select the four offsets starting at @0xC24382B0.

Now, right click on the selection and choose “Create struct from selection”. Click on the struct_xxx field and press “n” to rename it as string_tbl. Go back to the IDA View-A and click on the “string_tbl” label. Press “*” in order to create an array and make sure to check “Display indexes” and set 519 as an array size (519 multiplied by structure size of 0xC points to the end of the array)
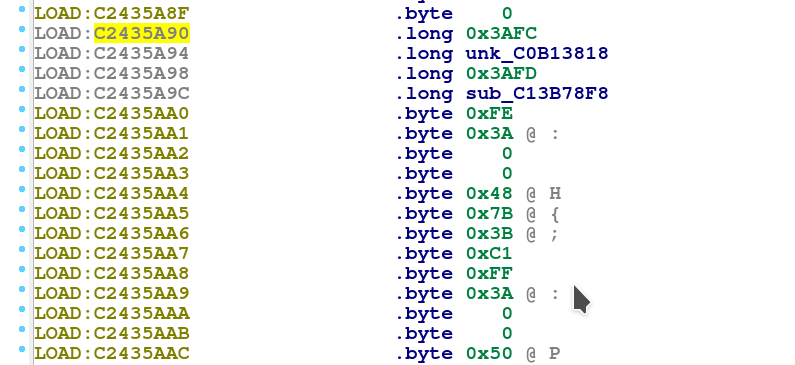
As we assume that the vtable is constructed close to each other, looking for the internal value 0x3AFC for the first string_tbl array entry using the binary search “FC 3A 00 00”, we find just above the string array another array starting at @0xC2435A90 consisting of two .long values, one for the internal index and one for the function offset.
So we can conclude that the vpointer table structure for getting the at command function pointers is:
- Internal index to function pointer @0xC2435A90
- String array @0xC2436D5C
- String to internal index array (string_tbl) @0xC24382B0
We create another structure at @0xC2435A90 and label it as “func_ptr”.

And we’re creating an array for “func_ptr” with the same size of 519 entries as above.
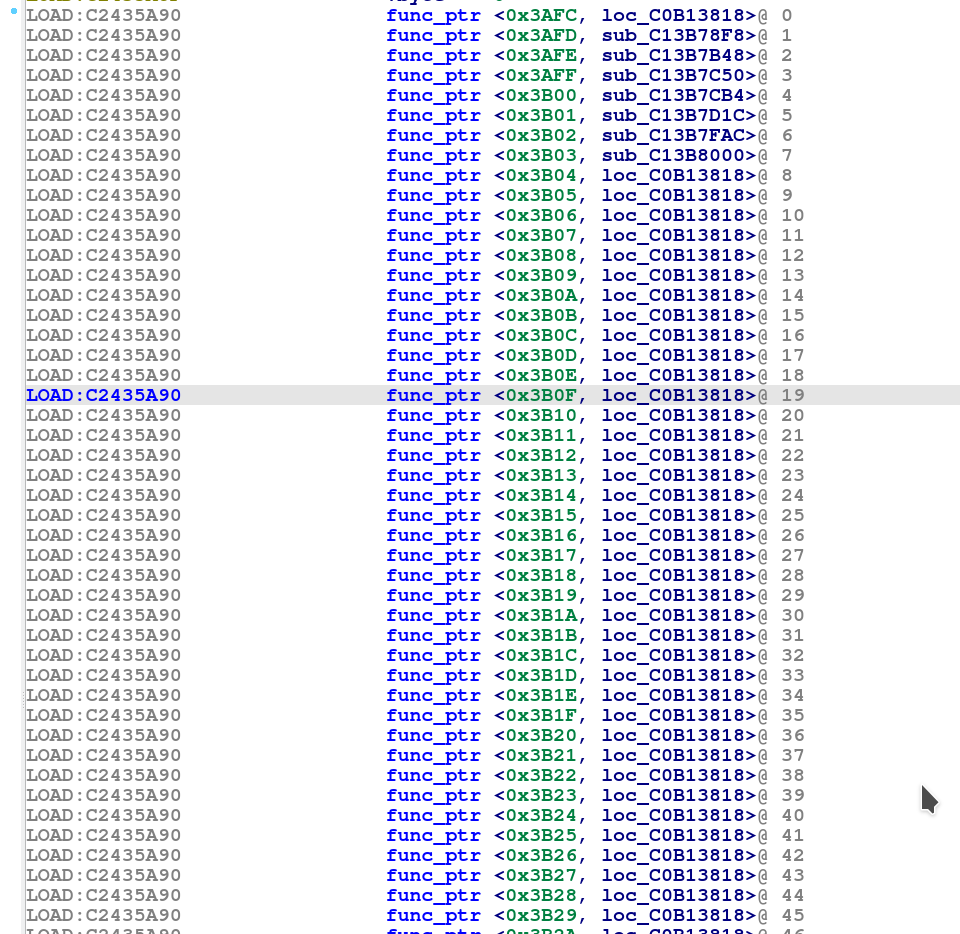
Now, for identifying the command that handles the “AT!OPENLOCK” command, we just need to lookup the entry with the internal reference.

The internal reference is 0x3CC2, which we look up in the func_ptr table, resulting at an entry at offset @0xC2435A90, pointing to the function call at @0xC0B12CC0 which is the openlock_cmd_function.

For those, who do not want to recover and rename all functions manually, I made a script called “qcmodemat.py” for IDA that can be downloaded over here, which can be run using the ida script file function after loading the elf file in IDA.
Conclusion and Outlook
Now that we have identified the function that is being called by the modem command “AT!OPENLOCK”, we are ready to start messing around with the new QDSPv6 modem and recover all AT commands. In the upcoming Part 2, we will face issues with the existing hexagon tools and we will have to make our own hexagon disassembler in order to successfully recover the AT!OPENLOCK challenge and response algorithm. Part 3 will have a closer look at the Netgear MR1100 devices for decrypting the firmware in order to recover the algorithm key. Part 4 will shed some light into exploitation of Qualcomm Modems and Hotpatching TZs.
Additional Remark
Some people asked why I haven’t used radare2. Some main reasons were :
- Opening the modem in radare2, analysis never finished even after days
- Radare2 doesn’t display instruction packets and without those brackets, it’s basically useless for serious hexagon analysis until it’s fixed, see bug commit here: here
Why IDA and not ghidra ?
- Ghidra hasn’t got IDE support for the instruction packet brackets. @NeatMonster showed that a hexagon plugin is possible and even a hexagon decompiler could work see here, but for that, parts of the GUI and API have to be changed. I’m really looking forward to those fixes happening, which may result in a hexagon plugin for ghidra, finally :)
Stay tuned !
Let me know what you think of this article on twitter @viperbjk or leave a comment below!